An architectural design brief is one of the most crucial steps in planning an architectural project.
It is a document that brings together all the key information provided by the client and the future users of the space, serving as a roadmap for the development of an AEC project.
In it, the architect documents which spaces will be needed, their approximate dimensions, and the specific requirements that must be met.
This way, even before the floor plan is drawn, there is a clear direction for what the project should include, helping avoid rework and unpleasant surprises later on.
Therefore, in this article, Blocks explains everything you need to know about the Architectural Design Brief.
You will learn what this document is, what it’s for, what it should contain, when to prepare it, and how to create an architectural design brief step-by-step!
Ready to get started? Let ‘s begin!
What is an architectural design brief?
An architectural design brief (also known as an architectural program) is a document that systematically sets out all the requirements of an architectural project.
In other words, it is like a detailed briefing that lists all the spaces, functions, and conditions the client expects to see in the final result of the work.
Therefore, the program is developed based on information collected from the client and users. Its objective is to make it clear what the project should include—serving as a reference for all subsequent design decisions.
In the architectural design brief, the architect lists the number and types of spaces the project should include (living rooms, bedrooms, bathrooms, kitchens, etc.), and specifies how each space will be used.
Furthermore, it collects data such as aesthetic preferences, site constraints, available budget, among other important points.
In short, it is a crucial document for any construction project and can be adjusted as new information emerges.

Bárbara Pavanello
CEO | Blocks®
“When crafting your architectural design brief, treat it as a dynamic roadmap—start by listening closely to every detail the client shares, translate those inputs into clear space descriptions, estimate areas, document technical constraints, and then give it a visual form (whether through a bubble diagram, a quick sketch, or a board with reference images). After that, revisit the starting point regularly and validate each item with the client—ask if the proposed dimensions make sense, if the relationship between the living room and kitchen fits their lifestyle, and if codes and budgets are well aligned. This way, the design brief doesn’t just stay on paper: it becomes the foundation of your project, guiding everything from the first sketch to the final delivery.”
What is the purpose of an architectural design brief?
The architectural design brief serves to guide all phases of the architectural project, aligning it with the client’s goals and expectations.
It functions as an initial plan: based on this needs assessment, the architect can begin the preliminary design with solutions that are appropriate for the client’s lifestyle and available budget. Its main purposes are:
- Define the project scope: The architectural design brief clarifies the goals and requirements that the project must meet, ensuring that nothing important is overlooked. It provides an overview of the client’s intentions, from functional aspects to finishing preferences.
- Guide design decisions: With the brief in hand, the architect has everything necessary to make informed decisions. For example, if the program states that the family enjoys hosting barbecue gatherings regularly, the professional will understand the importance of planning a gourmet area or a built-in grill.
- Prevent issues and rework: A well-prepared Architectural Design Brief helps prevent rework. When it is complete, the chances of forgetting an important requirement or needing to alter the project down the line are very small. On the other hand, if this initial stage is poorly or incompletely done, there is a risk of finishing the work with an unhappy client. After all, no one wants to discover at the end that a desired space or function is missing.
Investing time in the architectural design brief saves time and money during construction, as it reduces last-minute changes and costly adaptations.
The Architectural Design Brief is the first step in an architectural project to ensure that all the client’s preferences align with their real needs and expectations.
What should an architectural design brief contain?

A well-crafted architectural design brief should contain all the specific information required for the project’s development.
This information covers various aspects, from technical data to the client’s personal preferences. In general, a brief should include items such as:
- List of spaces and their functions: Record all the rooms and areas that will be part of the project, along with the purpose of each. For example, for a residence, this might include: living room, kitchen, number of bedrooms, bathrooms, home office, laundry room, etc.
- Approximate dimensions and areas: For each space listed, estimate the necessary or desired square footage. These initial measurements do not need to be exact, but they provide an order of magnitude for the size of each space, which also helps verify if the total area fits within the available lot or property.
- User profiles: Include information about who will use the space. How many people will live in the house or use the area? What is their age range? Are there children, elderly individuals, or people with special needs? Knowing the profile and routine of the users is essential for planning comfortable and functional spaces.
- Client preferences and lifestyle: To personalize the project, the architectural design brief must contain the aesthetic and functional preferences expressed by the client, such as hobbies and leisure activities.
- Site conditions: Every project takes place in a physical context, so the architectural design brief must consider data about the lot or existing building. For a new build, list information such as the size and shape of the lot, topography, climate and solar orientation, surrounding characteristics, presence of native vegetation, and any physical restrictions.
- Budget and deadlines: It is essential to include how much the client plans to invest in the work and the expected timeline for completing the project and construction. The available budget is a crucial piece of data, as it guides the level of solution that can be proposed.
- Technical and legal guidelines: Finally, the architectural design brief must include any relevant technical conditions, including applicable building codes and urban planning legislation (such as building coefficients, mandatory setbacks, maximum permitted height, accessibility standards, fire department requirements for commercial buildings, etc.).
With all this documented, it becomes much easier to move to the next project stage with confidence that the direction is well-defined.
When to create an architectural design brief?
The architectural design brief should be developed at the very beginning of a new architectural project, before any drawings or sketches of the plan are started.
As soon as the client brings a request, it is important to dedicate time to discussing and defining a clear architectural design brief.
So, create the architectural design brief at the beginning, along with the initial briefing meetings.
The process usually starts in the first conversation with the client, in which you ask questions and take notes to gather basic requirements.
It is unlikely that this assessment will be 100% complete in a single day, often the client needs to think about some questions, gather references, or discover their preferences during the discussions.
Therefore, the architectural design brief can be built in stages, over one or more initial meetings, and refined as the architect deepens their understanding of the project.
In any case, before starting the preliminary study or conceptual design, the architectural design brief must be defined and validated.
Only then should the professional proceed to sketch layout solutions and architectural concepts.
How to create an architectural design brief?
Now, let’s see how to create an architectural design brief step-by-step.
Below, we detail 8 steps you can follow to create an effective brief for your project:
1. Understand the program's objective

Everything starts with understanding the central goal of the project. Before listing rooms, it’s important to understand the client’s main objective for the project.
Ask: what problem does the project need to solve, or what desire should it fulfill?
It could be building a family’s dream home, renovating an apartment to be more functional, creating an attractive commercial space for customers, etc.
Understanding this higher purpose helps provide direction for all subsequent decisions.
At this stage, talk openly with the client about their expectations and what they see as a successful outcome.
The Architectural Design Brief must be aligned with the client’s purpose, as its function is precisely to meet the project’s objectives and the client’s specific requirements.
2. Gather client information

With the objective in mind, proceed to gathering detailed information from the client.
In this step, the architect acts like an investigator, asking many questions and listening carefully.
To make this easier, prepare a checklist or questionnaire to ensure no important topic is omitted.
Include questions such as: number of spaces; future plans that might affect the house or space; routine of space use; hobbies and leisure activities; aesthetic preferences; essential equipment or furniture; budget and timeline.
While listening, identify the client’s priorities. Clients often list many wishes; it is the architect’s role to distinguish essential items from secondary ones.
Remember: in this information-gathering stage, no detail is too small. The more relevant information you collect, the more complete your brief will be.
3. Define the spaces and their relationships

After collecting all the data, it’s time to start structuring the architectural design brief itself.
Based on the client’s information, list all the spaces that will be part of the project in an organized way.
Create a clear list: Entrance Hall, Living Room, Dining Room, Kitchen, Laundry Room, Master Suite, Children’s Bedrooms, and so on.
Next, consider how these spaces relate to each other. Which spaces need to be adjacent or connected? Which should be more private?
Do not list rooms in isolation. Think about the whole: which spaces should be contiguous, which may be adjacent, where transitional spaces are needed, and whether any partitions are desired.
Record these relationship notes in the brief, as they will be very useful when developing the layout.
4. Organize spaces by sectors

With the list of spaces and their main connections defined, the next step is to group the spaces by sectors or functional zones.
This step is known as project sectorization.
Basically, you categorize the spaces according to their use and privacy: social sector, private sector, service sector, and so on, depending on the type of project.
Organizing the spaces by sectors helps to visualize their distribution and proximity in a hierarchical way.
It is crucial to verify that all essential spaces are included and are logically grouped.
Sectorization, in addition to organizing an architectural project, also reveals which sectors need more attention regarding circulation.
By organizing everything into sectors, you ensure that the future project will have a functional arrangement.
5. Determine approximate dimensions and areas

With the spaces identified and sectorized, estimate dimensions and areas for each space.
Here, you quantify the architectural design brief, providing a more concrete spatial idea of what will be designed.
Return to the list of spaces and assign an approximate area (in m²) or at least desired linear measurements to each one.
You can base this on references from similar projects, technical standards, and, of course, the client’s expectations.
For example, if the client requests a large living room to host 10 people, consider a larger-than-standard area.
Remember these are approximate values, and you don’t need to get them right on the first try—the goal is to stablish parameters.
6. Define technical conditions

In this stage, incorporate the project’s technical conditions and specific requirements into the program.
While the previous steps focused more on client needs and spatial organization, here the focus shifts to normative, structural, and technical viability requirements.
Check items such as: legal and urban planning restrictions; technical and accessibility standards; infrastructure conditions; sustainability or efficiency guidelines; comfort specifications.
This step is for tying up technical loose ends. It does not necessarily require structural or MEP calculations, but it should record all known conditions that will influence the project.
7. Create a graphical representation

Now that the brief is complete in text and numbers, it’s worth creating a graphical representation of what has been gathered.
The representation is not the project itself but a visual sketch that helps communicate and visualize the brief.
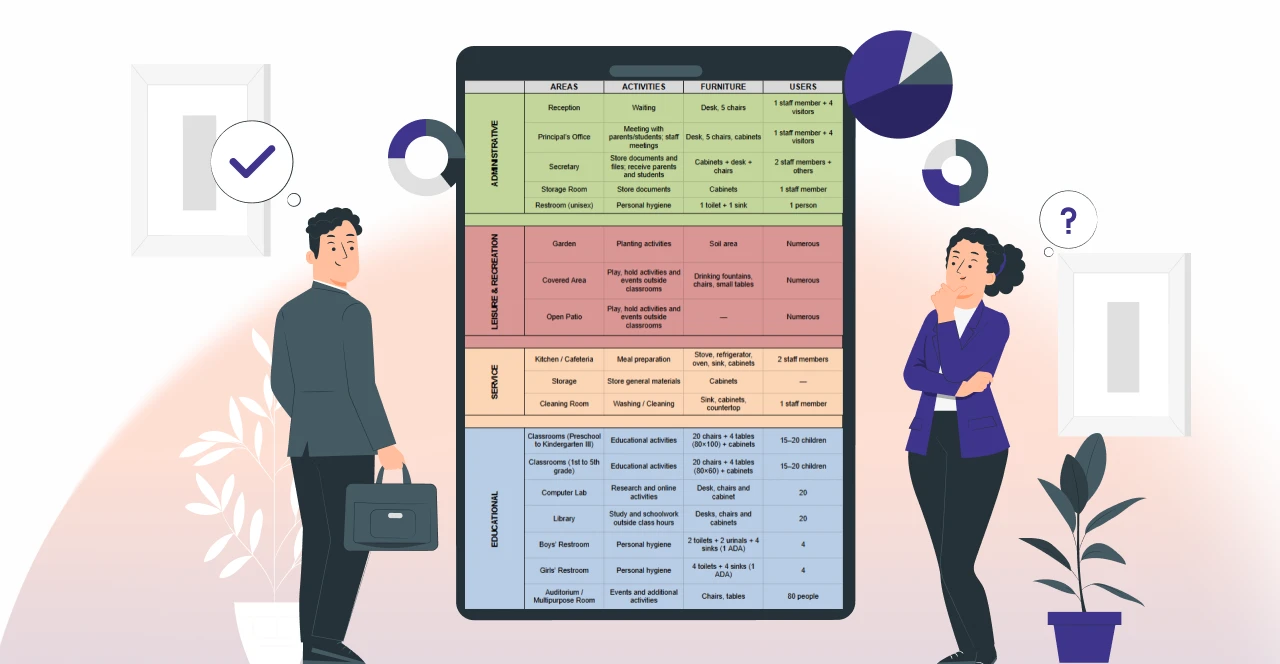
You can do this using flow and relationship diagrams, sectoral maps, illustrated tables and charts, or a preliminary sketch.
A graphical representation materializes the information visually, which greatly facilitates communication with the client, who may not fully grasp descriptions and numbers alone.
8. Validate with the client

Finally, never forget to validate the architectural design brief with the client.
After completing the previous steps, schedule a meeting to review everything together with the client.
Validation is crucial to ensure nothing the client said was misinterpreted or omitted.
Present the brief clearly, going through the items and explaining your understanding of each requirement.
When reviewing with the client, ask for their opinion: “Is anything missing? Do these dimensions make sense ? Do the priorities reflect what you want?”
Often, when seeing everything organized, the client may recall something they did not mention or realize some requests are less important.
Only after client agreement and approval of the brief should the professional proceed to draw the architectural project itself.
Make designing easier with the Blocks Plugin!
Creating a complete architectural design brief is half the battle for a successful project.
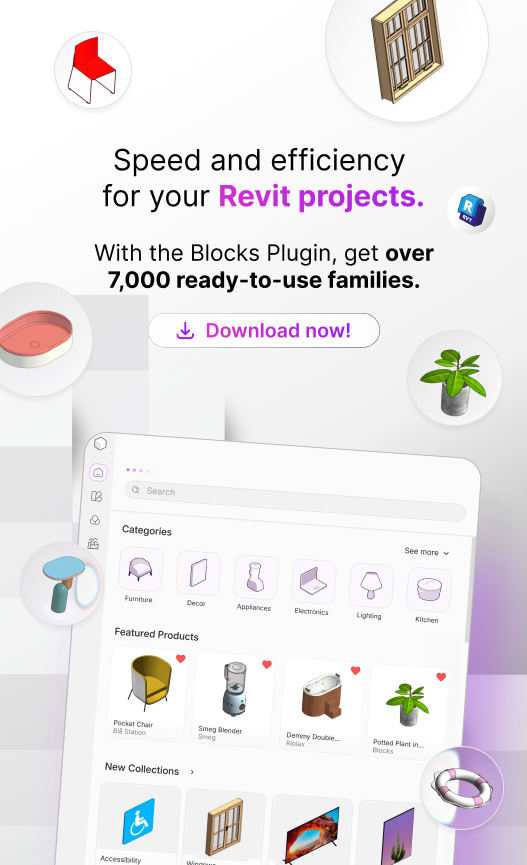
When it’s time to transform that brief into a modeled, detailed, and presentable project, you can rely on the Blocks Plugin: a tool that simplifies project development for architects and designers.
Our plugin provides access to a vast library of ready-to-use BIM families, from furniture and lighting fixtures to equipment and general architectural components.
Instead of spending time modeling each object from scratch or searching for families online, drag and drop ready elements directly into your Revit projects.
Take your projects to the next level with Blocks. Download our free plugin today!

Conclusion
Developing a detailed architectural design brief is a fundamental step that should not be skipped in the design process.
As shown, this document identifies all puzzle pieces before you begin drawing solutions.
A well-prepared architectural design brief streamlines the project’s progress and helps ensure a satisfactory outcome for the client.
Therefore, whenever you start a project, reserve time and attention to build a solid brief.
Now that you know what an architectural design brief is, what it’s for, and how to create one, why not apply this knowledge to your next project?
Did you enjoy this content? Follow the Blocks blog for more!